Gears of War 3 rigging reel (and a bonus tutorial!)

I’m always pretty terrible about keeping up with posting on blogs. Turns out I really like my free time to be filled with playing video games too much. But, back in September, Gears of War 3 was finally released. I hear it did pretty well!

I released a video of some of my work on the project. There was tons of work done on Gears 3. I setup and rigged every character in the game. Setup all of the gore, and wrote all of the animation pipeline tools.

HD link:  http://vimeo.com/32220149

(holy cow, I cannot believe a rigging reel has almost 16k views. Thanks everyone! Very honored!)


Also, Here is a little vid I made for someone on a message board explaining how I setup my hand roll attributes.


Perforce in Maya

about a week ago, I set out to get perforce functionality into maya, with the goal of keeping artists/animators focused on the art, and not having to worry as much about source control.  So, here’s a video going over some of the things I did to get Perforce working in maya, and some ideas for adding some more functionality onto it later.

Fast and Efficient Facial Rigging(GDC 2011 talk)

Ok! I finally finished putting together a pdf of my talk! It comes loaded with notes and even a few links to some of the video examples. It was a really fun and laborious process putting this talk together for GDC, but the reception has been positive and I am thankful for that!

Anyway, here is the pdf for the talk:

Jeremy_Ernst_FastAndEfficietFacialRigging

I hope to do a video overview soon even going into some of the files and whatnot. Enjoy!

Ghost Pose Tool

A couple of years ago, I wrote this tool for production on Gears. Pose libraries are always good to have, especially working with game animations, but I wanted a pose library tool that had a bit more flexibility. What if your character moves in space and you need the first and last frames to be the same? Sure, there are some ways to do this, but wouldn’t it be better if it was just a click of a button?

So I came up with something I called the Ghost Pose. What it does is brings in a “ghost” of your selected pose, and allows you to place that ghost pose anywhere you want, with any rotation. Then you simply snap your character to that ghost pose.

Here is what it looks like:

So here we have a UI that has a lot of our common game poses. The user selects a pose and a ghost of that pose comes into the viewport.

From here, the user can manipulate the ghost pose around. They can translate it or rotate it or whatever. This way, if you have a character walking through space, and you wanted your start and end to be the same, you could place the ghost of the walk pose at the end, and snap it, and you’d know it would be the same!

So, I moved this idle pose over to the left, and also rotated it. Now all I need to do is hit snap and the character will snap to that pose.

Nice! So what does the ghost pose look like? Well, the whole thing is super simple. All of the character geometry follows a naming convention. When the user wants to create their pose, It duplicates all of the character geometry in that pose, combines the meshes and deletes the history. From there, it places a locator in the positions of all the controls, including the root. It makes the new mesh the shape node of the root locator, and parents all other locators under the root. So when you are moving the ghost pose around, you are moving all of the locators around too. The snap script is simple as well. Just a bunch of xform querying and setting!

That’s it!

Maya Marking Menus

So wow, I kinda forgot I ever made this blog. Lots has happened since the first post way back when. Let’s see, Gears 3 has a beta coming out in the month of April, awesome. We released a kick ass, real-time, next-gen tech demo @ GDC. I went to GDC and saw lots of cool shit, and met lots of cool people. Which is what inspired me to even find this old thing, and maybe utilize it. So, first, an easy, mini-tutorial going over marking menus in Autodesk Maya!

So, marking menus are pretty awesome. If you’ve ever used the hotbox, you’ve used a marking menu. But, you can create your own custom marking menus very easily!

To do so, first, go to window–>Settings/Preferences–>Marking Menu Editor


Once there, you will see a bunch of the default marking menus Maya provides for the hotbox. To create your own, simply press the “Create Marking Menu” button.


Give it a name, and from here, you can start dragging shelf items into the boxes. The other cool thing you can do, is right click in an empty box, and select “Popup Submenu”.
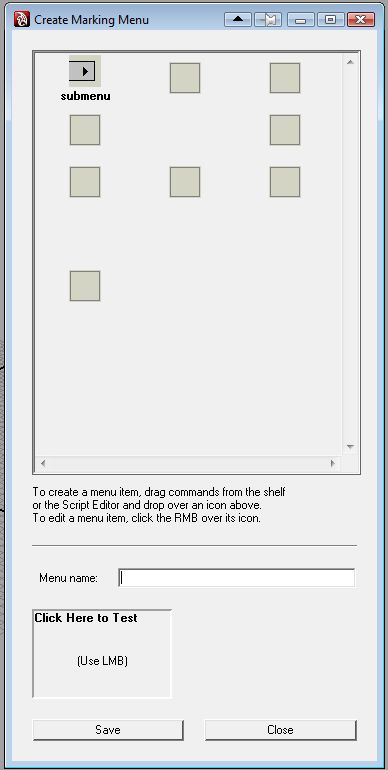


This opens a new window for you to drag even more commands into!


After you are done, you simply select where you want to use your marking menu(hotbox for example) and the region of the hotbox to use, and how to activate it.
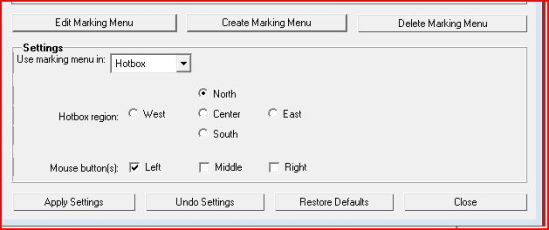


So, what can you use this for? Anything you want! I, for example, have made myself a marking menu for skin weighting. I have commands that set the paint weights tool opacity and value settings. I can switch between smooth and add modes, and I can toggle the value hold on my selected joints as well, all with simple gestures, which is far faster than shelf buttons, or by manually typing in the paint weights tool itself.


Here are some simple code snippets for the weighting commands:

//Fine weights polish:

artAttrSkinPaintCtx -e -opacity 0.25 `currentCtx`;

artAttrSkinPaintCtx -e -value 0.25 `currentCtx`;

//set paint mode to add

artAttrPaintOperation artAttrSkinPaintCtx Add;

//set paint values to full

artAttrSkinPaintCtx -e -opacity 1 `currentCtx`;

artAttrSkinPaintCtx -e -value 1 `currentCtx`;

…you get the idea. Okay! well, the perforce sync is done now, so back to work with me! 😉